

Introduction: Room Weather Station


In this crafting recipe I will show you how to make your own room meteostation (almost) from scratch. Without any 3D-printers or laser cutters!
It features CO2, humidity and temperature sensors, built in web server with settings and live charts, automatic constant readings logging (every 5 seconds), color indication for low/high levels of readings and sound alarm for high CO2 level with ability to set any monotonic melody you want.
As I tried to fulfill this "true DIY" philosophy of making as much as possible myself, I had to learn many new things and develop non-existent skills. I hope this instructable will motivate you to do the same! I should mention that this is actually my first Raspberry Pi project, and I had almost 0 experience with Linux OS (I only programmed on Windows so far). So I hope I didn't failed too much in the eyes of experience Raspberian people!
Without further ado, lets get to the supplies and costs. A couple of notes here. "My price" is actual cost of all the parts I purchased. It's higher than on Aliexpress or other stores, because its local electronics store and they have higher prices (I chose it for more reliable delivery). Also note that its hard to find some parts individually or in small quantities like 2x5 mm self tapping screws, for example. I ordered 100 g of them, 971 to be exact, but I still only included price of 8 that where used. Same thing with tools, because you can use tool for potentially unlimited amount of projects in future, it would be not right to include it's full price in the final cost of a device. Besides, some of you might have most of the tools already. I salvaged buzzer from annoying UPS unit, so I didn't had to buy it.
Supplies
Part							My price	Ali/Other price
Raspberry Pi Zero W					26.97		10
8 Gb microSD card							3
2.8" 240x320 TFT LCD SPI				11.72		8
CO2 MH-Z19B sensor					27.54		18.5
Temp/Humd GY-21 HTU21 sensor				3.02		1.5
Temp/Humd SHT31-D IIC sensor				5.00		2
Passive Piezo Buzzer					–		1
5V PWR Supply for RPI					6.44		5
10 Wire Ribbon Cable 28AWG 50 cm			0.47		0.5
8x 2x5 mm Self Tapping Screws				0.01		0.01
4 mm A4 Sheet of FK (non-toxic) Sanded Plywood		2.30		5
TOTAL							$83.46		$54.51
Instruments
- Card Reader for microSD Card
- Drill with 5 mm piece
- Small Hand-held Jigsaw
- Table Vice or couple of Clamps
- 7x2 mm File
- 4x4 mm File
- Hard, Medium and Soft Sandpaper
- Screwdriver (even better if comes with drill)
- Sharp end tool (draw compass, needle, nail)
- Polyvinyl Acetate (Wood) glue
- Glue Gun with 1 Glue Rod
- Soldering Iron
- Solder with Flux Core
- Acrylic Primer Spray Paint
- Acrylic Lacquer Spray Paint Black (or other color)
Optional Instrument and Parts
- 3rd Hand for Soldering
- 2D Printer
- Glue Stick (dry glue)
- Dupont Crimper
- 20x2 Pin Male Connector
- 5x2 Dupont Case
- 6x1 Dupont Case
- 3x1 Dupont Case
- 2x 5x1 Dupont Case
- 2x 2x1 Dupont Case
- 3x 4x1 Dupont Case
- 50x Dupont Females
- Even better – just buy Dupont kit with many different types
Step 1: Manufacture the Case


I did this step last, but it would be more time efficient to make it first and do next steps while primer/paint is drying. I designed case using SketchUp, so you can use SKP file to change my design or to see how to assemble it. For example, if you'll choose Dupont path in later steps, you'll have to adjust the thickness of a case according to your Dupont's height. I used ready made Duponts when designing it's thickness, but after I received my Dupont cases they turned out to be few mm higher and I had to drop the idea of using Duponts entirely. After making changes to the design, you can export your model for printing via placing all pieces flat, setting Camera → Parallel Projection, Camera → Standart View → Top and exporting it to LayOut by pressing Send to LayOut button. There you will have to select Full Size (1:1) scale and Vector rendering type under the SketchUp Model panel.
- Move draft from PC to plywood. You can use 2 approaches here:
- Print PDF file on a 2D printer with True size option in print settings, measure dimensions in SKP file and check if your printer or PDF software made any mistakes. Than use dry glue (glue stick) to adhere cut out pieces of draft to the plywood. This has benefit of saving much time on hand-tracing and perfect precision, but before painting you'll have to remove paper and this process is very long and tedious
- Load SKP file in SketchUp and use Dimension tool to get all dimensions, than trace it to the plywood by hand
- Drill all necessary holes on the back-plate. Note that side ventilation holes (above USB ports) are optional and if you don't have some advanced tools like drill press, don't drill them. Maybe I just had wrong kind of drill piece, but my hand drill ruined backside of the holes
- Cut out "windows" first, by inserting jigsaw and cutting around edges, but not too close. Better to leave some material and then file it down, than to overcut
- Use technique shown on image #6 to cut out small "battlements". First cut two perpendicular sides, then cut diagonally to one side, and then remove the rest
- Cut out giant screen "window" in the same manner as smaller ones
- Use 4x4 and 7x2 mm files to sand down any irregularities in your case pieces. Smooth it even further with sandpaper, if needed
- Make some final fine-filing for the screen to fit through the "window"
- Mark and cut out a groove for LCD pins to the right of the "window"
- Try to assemble everything up. If something gets stuck, file it down until everything holds up snugly, but not too tight
- Put your Pi on it's wooden "legs" inside and mark a grove for microSD card, then cut it out and test if it fits. It's always better to cut out bigger groove, than too narrow one. Also check if USB ports are lined up correctly and if not, file them down
- Apply polyvinyl acetate glue to all the edges, except the back-plate
- Apply scotch or other sticky tape on the top and bottom left sides, above and below screen "windows". This is done to mask plywood where you'll later glue Raspberry Pi's wooden "legs".
- Apply 2 coats of primer. As this was my first ever spray painting adventure, I did a pretty terrible job. So in order for you to not repeat my mistakes I'll give some additional tips:
- Cut out long strips of thin cardboard, fold them and make bottom and top-less cubes from them. Put your pieces on them while painting and not on the floor directly. I primed it on the floor without thinking, and pieces of primer stuck to the front side of the case after drying, pretty much ruining entire finish
- Try to use as few sprays as possible to avoid any lumps of paint after drying
- Paint and dry at 18° - 25° C
- Prime front side → wait 30 m → prime back side → wait 2 h → apply 2nd coat in same manner → wait 12+ h → repeat same process for paint (I'm not sure if it's 100% correct sequence, but I did it like this)
- Don't forget to paint edges! Yes, you could have noticed that my back-plate's top edge looks different from the rest. I just forgot to paint it. Yep. I had to use Indian ink to at least make it appear black
- And of course use safety googles and respirator while painting. As the last resort try to hold breath when painting if you can't get hold on any respirator
- Apply 2 coats of paint
- Put screen and Pi onto their respectable places on the plywood. Then use pointy tool to make holes for your self-tapping screws, then screw them in with the screwdriver, but not too tightly
- Glue RPI's wooden "legs" in place. You can do this with RPI screwed onto this "legs" for maximum precision, but be carefull not to fail as spectacularly as I did (see last picture). Yes, I broke microSD card in half while gluing RPI into place. Ouch.


Step 2: The Dupont Way (Optional)


If you choose this way, you'll need additional instruments and parts listed in Supplies section above. Personally, I wouldn't recommend this way, unless you'll decide to use thicker wires. My ribbon cable had super thin copper core, so Duponts couldn't grip it securely and sometimes signal was getting unstable. Anyhow, ability to make your own Dupont cables might come in handy for you in the future. I'll not go into details here on how to make Dupont connectors, there is plenty of info on the Internets, including Instructables.
- Solder 40 pin connector to Raspberry Pi if your Pi doesn't come with it soldered already
- Solder pins to all sensors
- Strip wires and use crimper to crimp all the wires
- Finish Duponts for all sensors and buzzer.
You don't really need to connect touch screen CLK, MISO and MOSI to LCD ones at this point, like you can see on the photo. It will be much easier and cleaner to solder jumpers onto LCD pins (this will not let Dupont to fit all the way, though). Alternatively you can solder jumpers to Dupont little "windows". Use diagram from next step to figure out how to connect all the wires, I used same colors in both Dupount and solder ways, for consistency.
Step 3: Wire Things Up


Whenever you chose Dupont Way or not, it's time to wire everything up and assemble all the pieces together.
- Referring to the diagram above, connect LCD to Raspberry Pi accordingly
- Using same diagram, connect all sensors and buzzer
- Using Glue Gun, attach CO2 sensor (leave buzzer unfixed, for now) to appropriate position
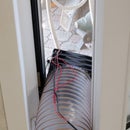
- Push sensors out of bigger "window", as shown in last photo. I tried my original plan that you can see on earlier photos and in SketchUp model, but it turns out that bottom sensor was heating itself up too much in such confined space. Also there is issue of RPI heating up air inside confined space of the case, despite the ventilation and not much load on Pi (2-3% CPU). Positioning sensors like on the last photo gives them maximum ventilation and most accurate results. Alternatively you could change design and cut out 2nd window for 2nd sensor, but this way they will have worse insulation against RPI.
Note: I used 2 Temp/Humd sensors in order to increase measurement accuracy and make it more reliable. For example, if one sensor sends corrupted data for some reason, RWS will use data from 2nd sensor. If both sensors send correct data, it will average results to increase accuracy. If both fail, which is highly unlikely, RWS will use last known healthy data values.
Step 4: Develop the Software (Optional)

Now, as I mentioned in introduction, I had to keep this project as close as possible to "true DIY". For this I decided to develop all the software myself, without using any IDE, just Notepad++ using pure C/C++. Window PuTTY's pscp command was used to transfer files to Pi and compile them. I must admit, I didn't anticipate just how hard this would turn out to be. While I understood basic concepts pretty well and had a clear image of how things should work in my mind, when you actually start to implement all the ideas, so much tiny little details and micro-problems comes up that it just overwhelms you. For the record, this was my first web server, first multithreaded application and first low level LCD driver.
To write a detailed guide on everything that I implemented in this program would take huge separate Instructable (maybe even more than one). So, what I will do here is – I'll give you general modules that you should create and will let you fill all the details yourself. You can use any programming language you fancy.
- Create drivers for all sensors. This is relatively easy, they have pretty good, documentation
- Create LCD driver and basic 2D graphics engine with pixel blending to be able to display data on the screen
- Create monotonic song engine to play any melody you want as an alarm for high CO2 level. I must admit that my knowledge in music is not very deep and I had to use some random Arduino guy's ideas and songs from here
- Create multithreaded web-server that can handle arbitrary amount of clients, change devices settings and display real time charts
- Stitch everything together
You should implement all this modules separately and test them in isolation. Only move to the next one when your current module is working stable and error free. Don't forget to use mutex locks in the right places to ensure thread safety (debugging multithreaded program is a nightmare), don't overuse them though, remember, locks have high overhead. For the web-server I can give you a little tip. Use 2 semaphores and 1 mutex in conjunction with a queue to ensure thread safety and effective system resource usage (consumer-producer pattern).
Refer to my code if you get stuck somewhere along the way. I also attached all sensors and LCD documentation I could find below this step.
Step 5: Install the Software

No matter if you made your own software or chose to use mine, you will still need to install it somehow! Here is how to do it:
1. Write RPI OS Lite on SD card using Raspberry Pi Imager. Note: you might want to do next 4 steps before you put your Pi inside case, this will save you from trouble of removing it to write SD card
2. Create wpa_supplicant.conf file, add your WiFi information, put it in SD card's boot folder (caution, it must have Linux line endings to work properly):
ctrl_interface=DIR=/var/run/wpa_supplicant GROUP=netdev
update_config=1
country=<Insert 2 letter ISO 3166-1 country code here>

network={
 ssid="<Name of your wireless LAN>"
 psk="<Password for your wireless LAN>"
}
3. Put empty file called "ssh" in boot folder
4. Edit config.txt in boot
#Uncomment these lines:
dtparam=i2c_arm=on
dtparam=spi=on
#Add these lines to the end of file:
enable_uart=1
dtoverlay=disable-bt #only if you don't need bluetooth for any usefull purpose
5. Boot up pi
6. Connect via SSH (for example, PuTTY on Windows)
7. Change pi user password via passwd command
8. Launch sudo raspi-config and do this:
- Interface Options -> SPI -> Yes
- Interface Options -> I2C -> Yes
- Localisation Options -> Timezone -> Choose your Timezone
- Interface Options -> Serial Port -> No -> Yes -> reboot
9. Install wiringPi via:
sudo apt-get install wiringpi
10. Update wiringPi to latest version:
cd /tmp
wget  https://project-downloads.drogon.net/wiringpi-lat...
sudo dpkg -i wiringpi-latest.deb
gpio -v // Should display 2.52
11. Install git and clone software:
sudo apt-get update
sudo apt-get -y install git
cd
git clone  https://github.com/ScienceDiscoverer/RWS
12. Build program:
cd RWS
make
13. Now you need to turn this program into daemon, so it would be automatically started on every system boot, this will make Room Weather Station autonomous. Create rws.service file:
[Unit]
Description=Room Weather Station

[Service]
Type=simple
WorkingDirectory=/home/pi/RWS
ExecStart=/home/pi/RWS/build/rws

[Install]
WantedBy=multi-user.target
14. Copy this file and give it permissions:
sudo cp rws.service /etc/systemd/system/rws.service
sudo chmod 644 /etc/systemd/system/rws.service
15. Test if everything works correctly:
sudo systemctl start rws
sudo systemctl status rws // Should be "active"
sudo systemctl stop rws
16. Enable rws as automatic daemon on system startup:
sudo systemctl enable rws
17. Reboot Pi and test if rws daemon started correctly:
sudo systemctl status rws
18. If you hadn't fixed your buzzer to the case yet, do it. Then close the back-plate.
Now you can test how web-server is doing. But first, go to your home network router settings and set static IP for your Raspberry Pi, this will ensure DHCP will not mess up your server. Now go to your Pi's IP in any browser. Try it on your Pocket Personal Computer (people call them "phones" these days, for some reason) too. Install font that is located here and your browser will actually use same font that your Pi's LCD screen uses! I guess font could be even installed on PPC ("phone"), refer to guides spesific for your model.
One last optional thing you could do, is to register custom local domain name for your Pi. This will let you impress your guests with fancy adress like http://rws.net, or something like that. This would be really neat, but it will require you to turn your Pi into DNS server, and rout ALL DNS requests you do while browsing on your main PC through it, instead of going directly to the router. I think its overkill and generally too much trouble, but you could try. If somebody knows some easier way to make local domain name for Pi, please share it in the comments!
You can safely poweroff Raspberry Pi if you press in the top right corner of the screen and then confirm by pressing X button. Program will close all sockets, save all files and exit safely, then it will call poweroff command. Use this when your mains will drop, or you need to move RWS somewhere, no need to login via SSH! By tapping in any other place on a screen you will switch LCD off and set it into sleep mode. Press screen again to switch it on. While LCD is off, there will be no alarm sounds on high PPM, but readings will still be collected and regularly logged on SD card. You can also access web interface with LCD off, no problems.
By the way, readings are saved in the highly compact binary format in this manner:
4 bytes for UNIX timestamp and 4 bytes for actual readings:
Actual readings: 0000000000000 0000000 00000000 0000
                         CO2 ^  humd ^   temp ^ t/10
13 bits for CO2, 7 bits for humidity, 8 bits for temperature and 4 bits for temperature decimal fraction. This way readings for entire day, with 5 seconds intervals will use only 138 240 bytes. 4 147 200 bytes for month and 50 457 600 bytes for year. In fact, 3 GB of space can hold data for over 60 years! So don't worry too much about your Pi's space. You can download readings via web interface at any time. You can even delete it via browser too, no need to login into Pi.
To convert .rws file to .csv file, you can write your own convertor in a frew minutes, its super simple. First get date from first 4 bytes, convert it to human readable date. Then just few lines of code to extract readings:
int co2 = r.rd >> 19;
int humd = (r.rd & 0x7F000) >> 12;
float temp = ((r.rd & 0xFF0) >> 4) + (r.rd & 0xF)/10.0f;
And then just save it to .csv file (or any other format you want). If you don't have time for this, you can use my simple convertor here. Download this .exe file for Windows, and just drag-n-drop your .rws file onto it (or launch in terminal with 1 argument of source file name). For Linux you can just compile source code. After this you can open .csv file in Excel or any other program that allows extensive data analysis, building charts etc.
Step 6: Possible Mods and Improvements


1. I was actually impressed by the quality of the LCD, for its price. First photo is it's full range, 18 bit depth, 2nd is 16 bits I used for the project (for better framerate). This means you can use this setup for your other potential projects that requires LCD.
2. Touchscreen is not super accurate but good enough for cheep resistive one. As you can see in the video, it's not the best tool for digital art, hehe, but it should be totally fine for reasonably medium sized UI. I use touch screen only minimally in this project, but you can use my driver for it to create some more advanced stuff.
3. Adding battery power or supercapacitor based UPS system. This will protect your data from potential mains outrages and will make RWS portable. I didn't add it because I only intend to use it in stationary mode and connected it to external UPS unit (actually one that I salvaged buzzer from).
4. If you plan to add battery and make it portable, consider using E-Ink screen over LCD. You can see on the video, I was actually first planning to use E-Ink display, but I found it's refresh rate too slow and blinking dark screen is annoying. However, it uses much less energy than LCD and with slower update rate (I use 1 second, it's too much for E-Ink) it should be better for portable system.
5. Paint-job could use a lot of improvements, as you can see from photo, front side is totally wrecked. It's first prototype though, so maybe it will add it some charm. Still, I hope you can make much better job of it than me!
If you read everything and ended up here, wow! I acknowledge that this Instructable turned out to be tad bit TLDR than I wanted it to be... Sorry for that! It took me almost 2 months to develop this thing from scratch... It was a huge deal for me to finish it, because I had this idea for several years by now, but always was putting it away for later.
I'm kind of sad that I couldn't finish it in time for 14.03.2021 and Raspberry Pi contest, but hey, it's better later than never, eh?

![Tim's Mechanical Spider Leg [LU9685-20CU]](https://content.instructables.com/FFB/5R4I/LVKZ6G6R/FFB5R4ILVKZ6G6R.png?auto=webp&crop=1.2%3A1&frame=1&width=306)


